
These stills are relatively easy to make. The one outlined in the article is more self-contained and safer, the one in the video is easier to make but a bit less safe.
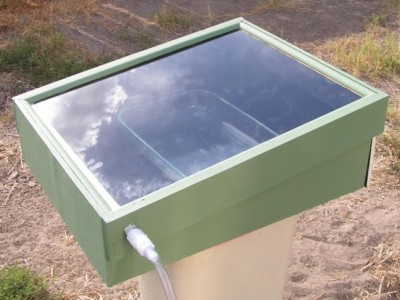
The still above is made from the instructions below.
Directions to Make the Solar Still
To make a solar still of this type, you’ll need to make a box out of plywood. You can’t see it well in the picture, but the white line at the back of the still is a door, which flips down to allow the water pans to be placed inside it. For water pans, I used two large rectangular Pyrex dishes. To accommodate them, the inside dimensions of the box are 19 inches wide by 23 inches long. I was careful about this measurement, as glass commonly comes in pieces that are 24, 36 and 48 inches. Had I made the box just a little bit bigger, I would have needed to buy a 36-inch piece of glass and waste most of it.
The front of the box (the end with the catch tube) is 6 inches tall, while the back of the box is 9-1/2 inches tall. This allows sufficient slope to cause the condensed water to run down to the catch tube (more on that in a moment). The sides of the box are constructed of two layers of half-inch plywood, while the bottom is of 3/4-inch plywood. That gave me sufficient thickness at the bottom to make it easy to connect it together.
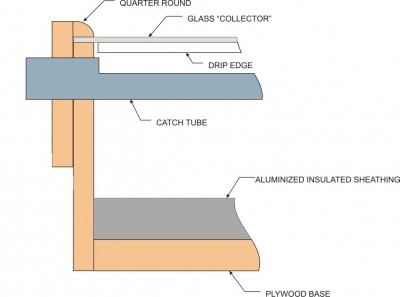
The sides and ends of the box are double thickness, providing a notch at the top for the glass “collector” to mount into. The outer piece of plywood should stick up half an inch above the inner one. I purposely made the outer piece of plywood “short” so that it would provide a ready handle for carrying and moving the solar still.
When inserting the glass, it should be held in place by silicone caulk. Quarter round or base shoe can be placed above it to finish off the box. Be careful when nailing the quarter round in place, so as to not hit the glass with the nail or hammer.
A piece of three-fourths or one-inch thick aluminized insulated sheathing needs to be cut to fit the inside of the box and placed in the bottom, aluminum side up. The aluminum surface of this piece of sheathing and the entire inside of the box should be painted flat black to absorb as much light as possible, converting it to heat. The aluminum coating on the sheathing will readily absorb and transfer this heat to the Pyrex baking dishes. Pyrex is used to reduce the risk of breakage.
The hardest and most important part of the design is the drip edge and catch tube. I used a rubber door seal (without the metal backer) as the drip edge. You can glue it in place with silicone caulk, allowing the caulk to dry fully before turning the glass over. Be sure to fill the “uphill” side, where the drip edge attaches to the glass, to provide a smooth transition for the water drops to flow down. The drip edge needs to be located directly above the center of the catch tube. So, you will need to place the glass on the box, mark it for the drip edge and then remove it to install the drip edge to the glass, before installing the glass into the solar still.
The catch tube is a piece of half-inch PVC pipe. The outside diameter of half-inch schedule 40 PVC is slightly less than seven-eighths of an inch, making it easy to put a hole through the side of the still for it with a spade bit or forstner bit. Drill partially through the opposite wall of the still’s box from the inside, so that there is a pocket for the catch tube to sit into. Glue it into this partial hole with silicone caulk to both seal the wood and hold the drip tube in place.
To make the catch tube, make two lengthwise cuts in a piece of half-inch PVC pipe, about 120 degrees apart. It is easier to do this if you make the cuts too long, and then cut the tube to length. The cut-out portion of the tube should span the entire still, with the full tube starting where it goes through the side of the box.
The drip tube should be held in place by a pin at the outlet end. This can be a small nail. Just drill a hole down through the side of the still’s box and insert the pin to keep the tube from pulling out. A half-inch slip to half-inch threaded coupler is attached to the end of the catch tube, with a barbed fitting connected to it. A short piece of tubing is connected to this fitting.
Using the Solar Still
The solar still can be used all day long, even if it is slightly overcast. If it is properly sealed with paint, it can be left out even in a rainstorm. To use it, place the still in a place where it will receive good sunlight, without any possibility of it being shaded. Point it toward the south so that it can capture the most sunlight. Place a water jug or food-grade five-gallon bucket so that the drip tube will empty into the bucket or jug.
Fill both Pyrex pans with water and place them inside the still, ensuring that the door closes securely, without any air gaps. While the solar still is not fully airtight, you don’t want the water vapor escaping into the atmosphere. Leave the solar still and come back later to collect your water.
You can use literally any water with a solar still. It does not need to be pre-filtered in any way. Debris left in the water will stay in the Pyrex pans, while the clean water will be distilled out. If the water used is dirty, full of debris and silt, you will want to rinse out the Pyrex pans when it is time to refill them.

You guys are unbelievable. #1, you will NEVER find distilled water in a river Brian. #2 you cannot substitute 1 oz. Of veggies to replace all the minerals you need from drinking water. #3 distilled water is drinkable, however, you will get more and more dehydrated as time goes on. I see all of you pro distilled people havent done much research. Stop going by, I drank distilled water and I’m fine. You didn’t drink straight distilled water for days or you would be dead.
the a.t.f. will have u in jail claiming u were trying ti distill alcohol.
Jason Garrison, love that I idea! What type tubing?
You can make some good hootch with it too.
if ya dont let it get above around 165 deg ya can get all the water out an have a fine drink
Peter Best says:
“Rainwater is distilled water. It evaporates from the oceans, lakes and wet surfaces. The water vapour rises in the air until it reaches the “dew point,” the temperature at which it condenses to form clouds. When these clouds cool, by rising high enough, the vapour condenses to form droplets. We call this rain.
Rain contains no minerals at all. It has some dissolved CO2 and Nitrogen, from the air, making it very slightly acidic. It contains no toxins unless it formed downwind of a coal-fired power station or similar.
Water from dams contains some minerals. Water from wells and bores contain more minerals, depending on the geology of the aquifer.
Rain water is not bad for you.”
From: http://www.truthandaction.org/purify-drinking-water-solar-powered-still/comment-page-1/#comment-434925
Rainwater is distilled water. It evaporates from the oceans, lakes and wet surfaces. The water vapour rises in the air until it reaches the “dew point,” the temperature at which it condenses to form clouds. When these clouds cool, by rising high enough, the vapour condenses to form droplets. We call this rain.
Rain contains no minerals at all. It has some dissolved CO2 and Nitrogen, from the air, making it very slightly acidic. It contains no toxins unless it formed downwind of a coal-fired power station or similar.
Water from dams contains some minerals. Water from wells and bores contain more minerals, depending on the geology of the aquifer.
Rain water is not bad for you.
truth and action rain water IS NOT distilled water as when it falls through the air it collects all kind of bacteria an what ever else that is in the air in the area
It is however well worth it to undertake replacing all them and glass doors with bay windows.
There won’t be anything soft hanging from your windows that can attract dust,
dust mites, pet dander, and other allergens.
My own experience in replacing the windows of a mid-level condo was excellent.
🙂 I like this so I can distill water to make it pure! Would never use it on fermented corn, rye, agave or potatoes though!